Using Smart Wallet in React
By using the wallet SDK alongside the React SDK, you can use smart wallets in your front-end applications easily.
In react, there are three ways to get started with smart wallets:
- Option 1 - Using the
ConnectWalletcomponent - an out-of-the-box UI to connect your users with any wallet including smart wallet. This uses the Wallet SDK under the hood. - Option 2 - Using the
useConnecthook to connect users and create a custom UI. - Option 3 - Using the
Wallet SDKdirectly for level control and full customization of the connection logic.
1. Deploy an Account Factory
Deployable via the explore page or build your own ERC 4337 compatible factory contract using the Solidity SDK.
Choose the right smart wallet setup for your app. thirdweb offers the following three different kinds of smart wallets:

Read about the differences between the three smart wallet types here.
2. Create an API key
To use the smart wallet bundler and paymaster, you must create an API key and a billing account.
To create an API Key:
- Head to the settings page in the dashboard and click the API Keys tab.
- Click on Create API Key:
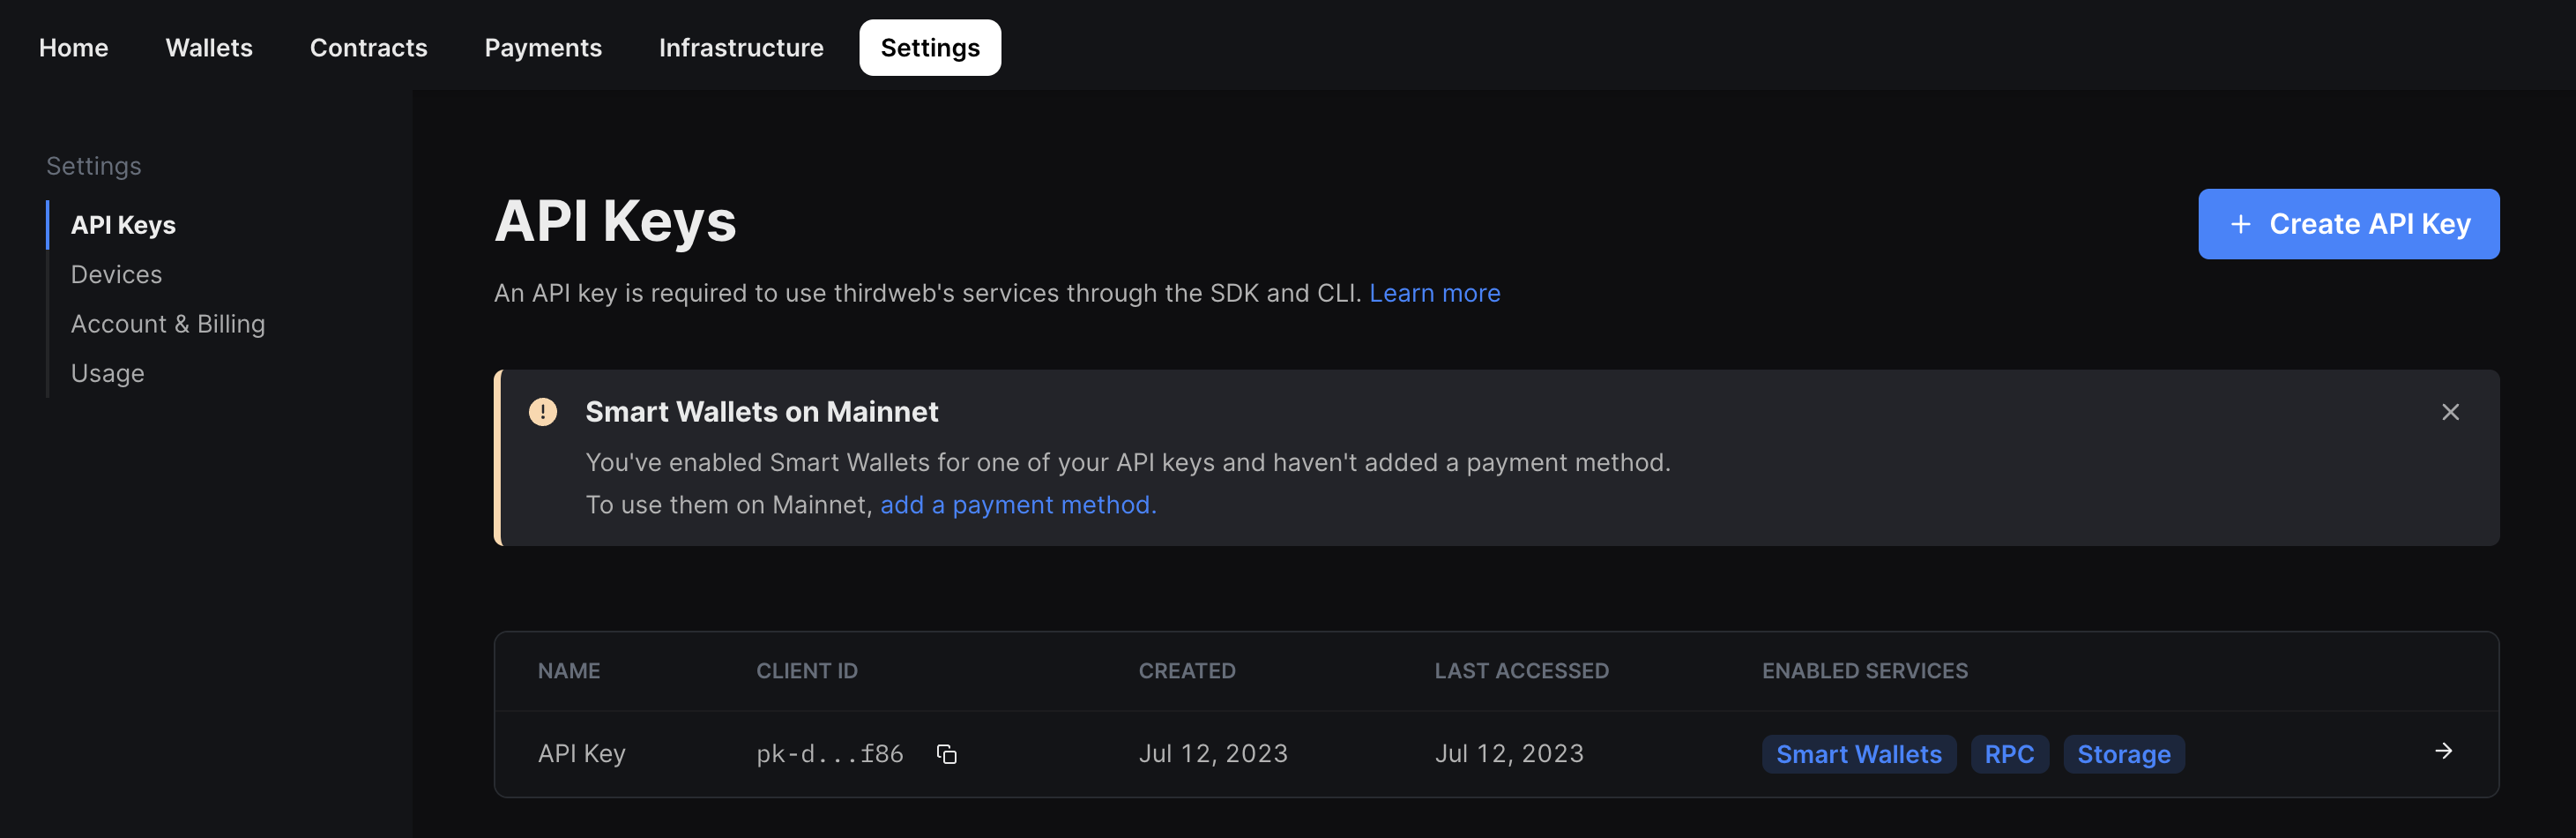
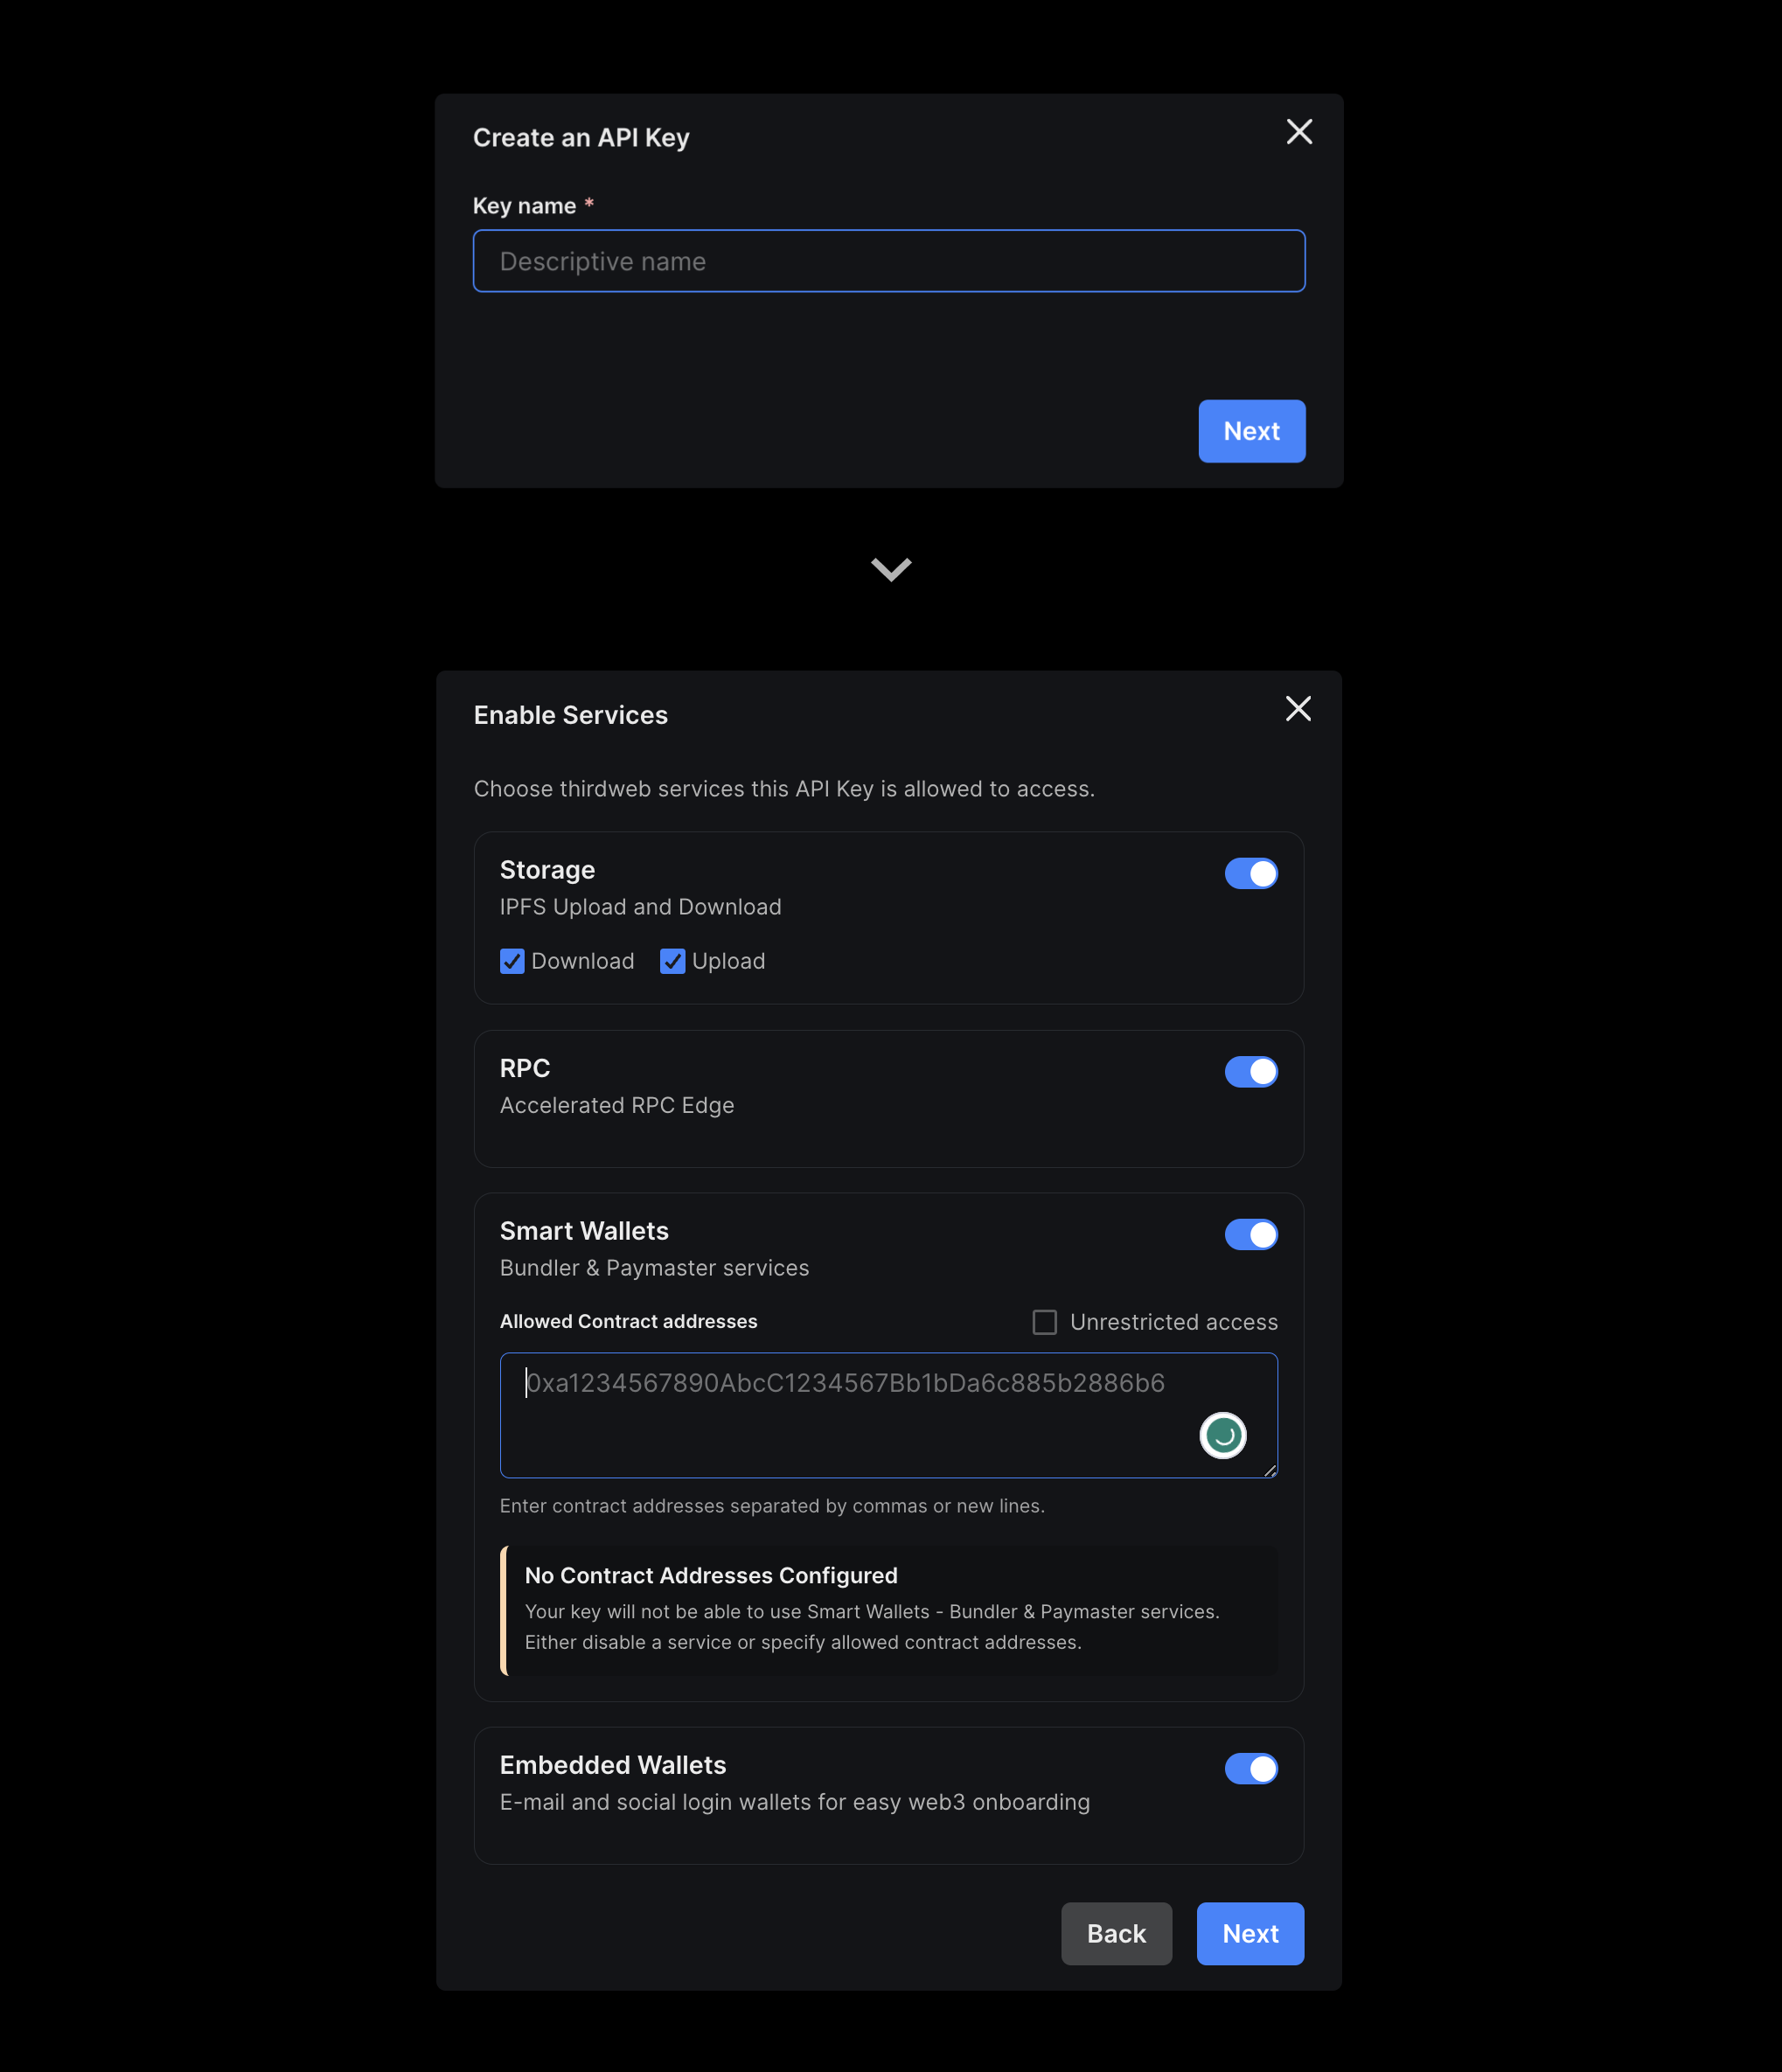
- Give your API key a name and click Next.
- Make sure that the Smart Wallets services are enabled, and any addresses that your deployed smart accounts interact with are added to the Allowed Contract Addresses section:
- Click Next and then add your local host and production/preview domains to the Set Access Restrictions section. Click "Create" to create your key.
- Copy your Secret Key and store it in a safe place like a password manager. You will not be able to see this key again.
- Click I Have Stored the Secret Key Securely and your key will now be visible from the API Keys table.
- Note: to edit your private key at any point, click on the key from the table and then click on the Edit button.
- Copy your clientId. Since we are building a front-end application, we will need to use this key to build our application.
To use smart wallet infrastructure on mainnet you will also need to create an account and add a payment method.
3. Create an App
To use smart wallets in a React app you can either:
- Use npx thirdweb create command to create a new project with the dependencies already installed.
- Add the dependencies to an existing project using
npx thirdweb installor your favorite package manager.
In this guide, we'll create a new project.
Create a New Project
Open your terminal and run:
npx thirdweb create app
When prompted, select/input the following options:
- A name for the project
EVMas the blockchain- Select your desired environment e.g.
Next.js TypeScriptas the language.
This will create a repository.
4. Build your connection UI
4.(a) Using Connect Wallet
To use the Connect Wallet component to connect your users to your app using smart wallet,
we need to pass a smartWallet to the supportedWallets prop in ThirdwebProvider.
You can change the configuration based on your requirements, but for this demo, we will enable gasless transactions and use a localWallet as the personal wallet. You can learn more about the configuration here.
import { smartWallet, localWallet } from "@thirdweb-dev/react";

const personalWallet = localWallet(); // or any other wallet

export const smartWalletConfig = smartWallet(personalWallet, {
  factoryAddress: "your-factory-address",
  gasless: true,
});
Pass the configuration to the provider:
<ThirdwebProvider
  clientId="<your-client-id>"
  activeChain={activeChain}
  supportedWallets={[smartWalletConfig]}
>
  <App />
</ThirdwebProvider>
Now, import the ConnectWallet component from the React package and add it to your app:
import { ConnectWallet } from "@thirdweb/react";

function App() {
  return (
    <div className="App">
      <ConnectWallet />
    </div>
  );
}
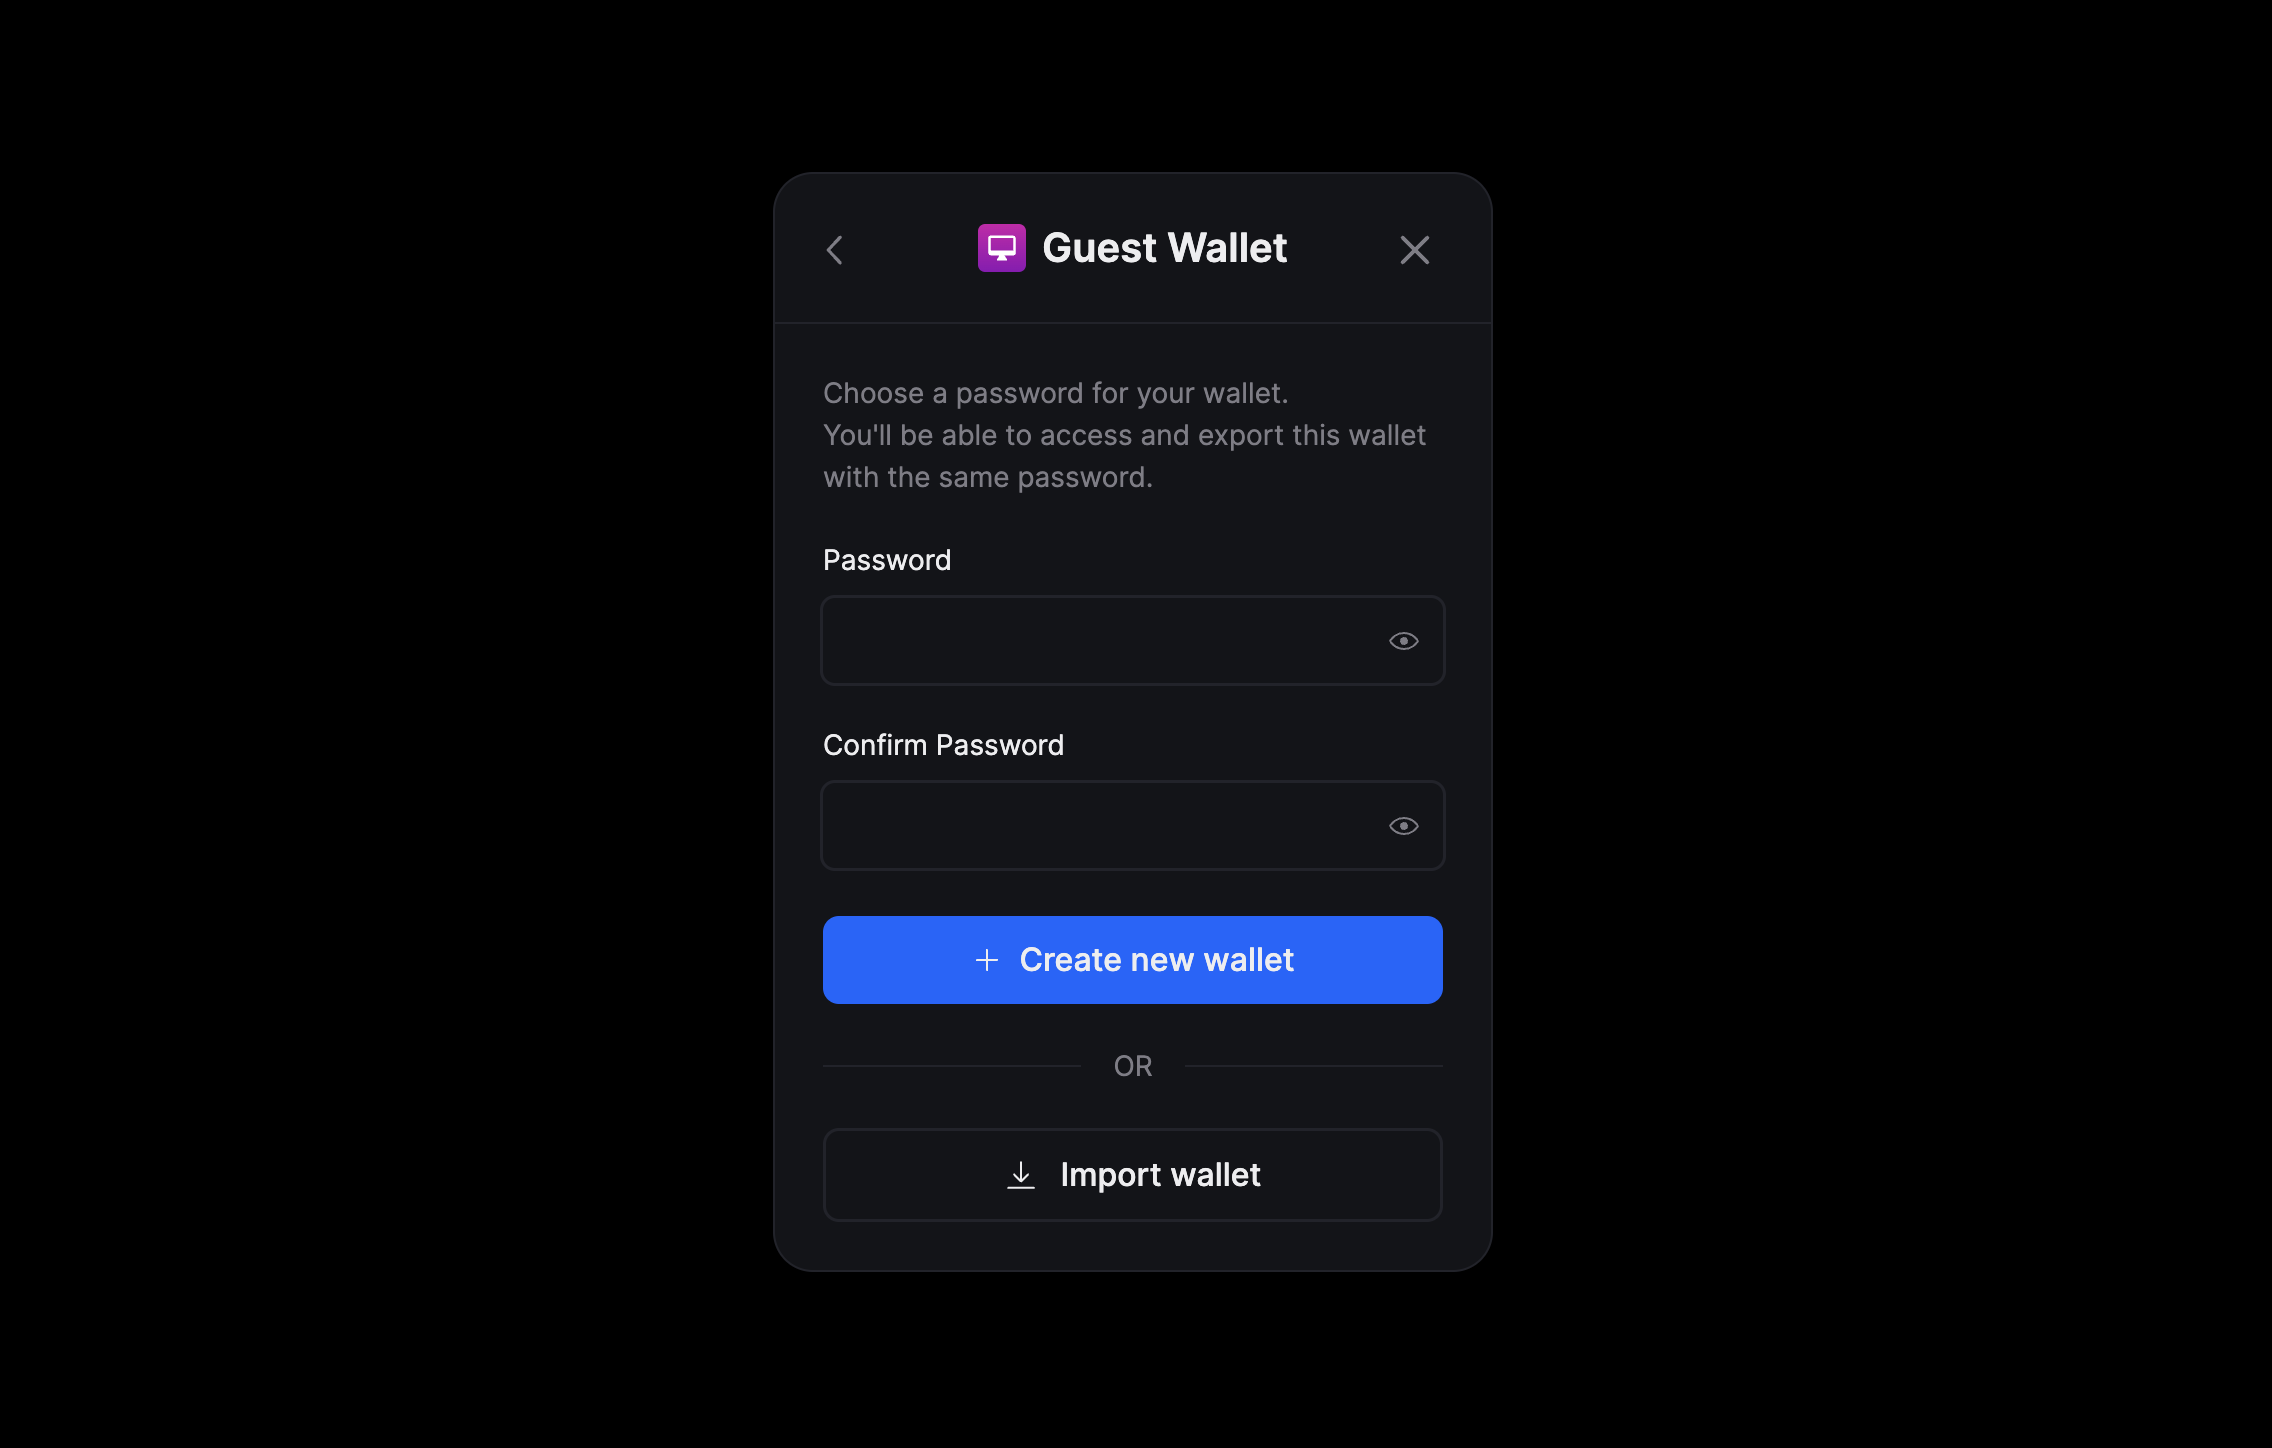
Clicking on the connect button will show the following Modal which allows you to create or import a local wallet.
This is the personal wallet you are using to initialize the smart wallet. For local wallet, you can create a new wallet with a password or import a previously created wallet.
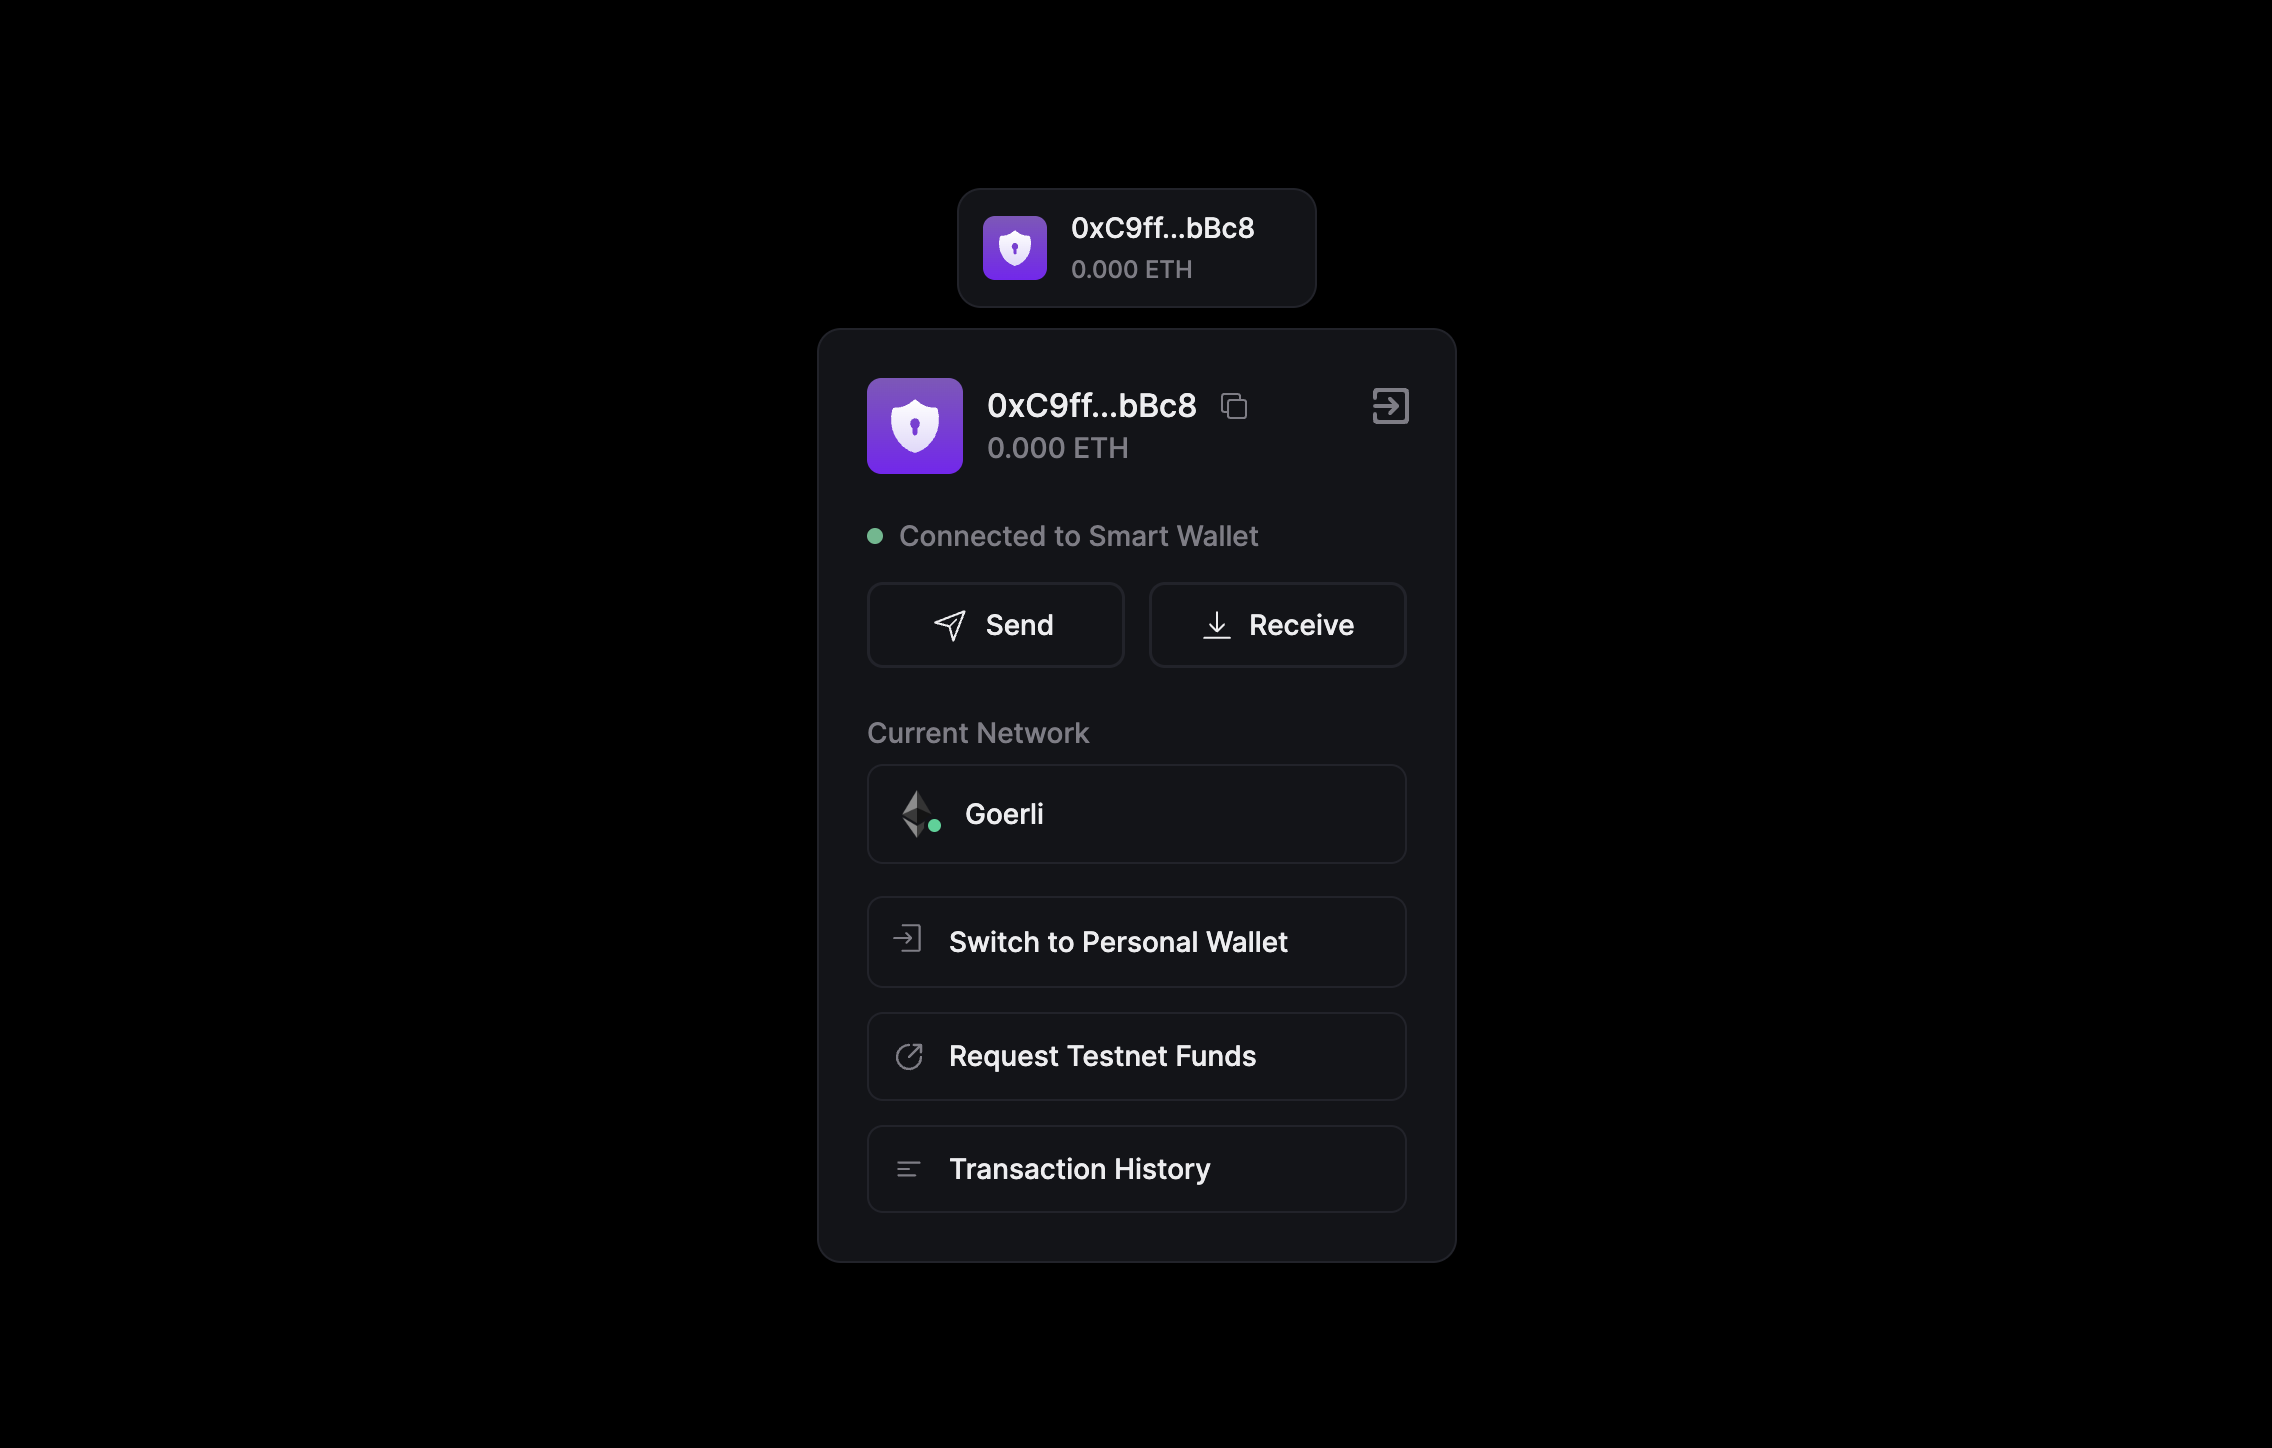
After connecting your personal wallet, a smart wallet is created for you and connected to the application:
4.(b) Using the useSmartWallet hook
The useSmartWallet hook allows you to programmatically connect your application to the wallet. You will need to build your own UI for connecting the wallet.
import { useSmartWallet, metamaskWallet } from "@thirdweb-dev/react";
import { Goerli } from "@thirdweb-dev/chains";

function Example() {
  // here we're using metamask as the personal wallet
  // can be any other wallet, including localWallet(), embeddedWallet(), etc
  const { connect } = useSmartWallet(metamaskWallet(), {
    factoryAddress: "0xE38fAC32BbA9F1Fe700a5D7f5630236171fa87e4",
    gasless: true,
  });

  return (
    <button
      onClick={async () => {
        // nothing to do here, all handled internally
        const walletAddress = await connect();
        console.log("connected to smart wallet", walletAddress);
      }}
    >
      Connect
    </button>
  );
}
5. Use the Smart Wallet
Now that you have connected your smart wallet to your app, you can use it to send transactions and interact with smart contracts.
5.(a) Claim an NFT and fetch owned NFTs
Deploy a NFT Drop contract from the explore page or build your own ERC 721 compatible contract using the Solidity SDK.
To claim an NFT, we will use the useContract hook to fetch the contract and the Web3Button component to send the transaction.
import { useAddress, useContract, useOwnedNFTs, Web3Button } from "@thirdweb-dev/react";
// The ThirdwebProvider setup above already handles connection to the smart wallet
// Within the provider, you can use the react SDK hooks to interact with the blockchain
export default function MyComponent() {
  // Get the connected smart wallet address
  const smartWalletAddress = useAddress();
  // Fetch owned NFTs
  const { contract } = useContract("0x..."); // your nft drop contract
  const { data, isLoading } = useOwnedNFTs(contract, smartWalletAddress);
  // Mint a new NFT
  return (
    <Web3Button
      contractAddress={"0x..."}
      action={(contract) => contract.erc721.claim(1)
      }
    >
      Mint NFT
    </Web3Button>
  );
}
`;
6. Bonus: Add a Session Key
To add a session key to your smart wallet, you can use the useCreateSessionKey hook to add a session key to the currently connected smart wallet:
import { useAccountAdminsAndSigners } from "@thirdweb-dev/react";

const keyAddress = "{{key_address}}";

const Component = () => {
   const {
     mutate: createSessionKey,
     isLoading,
     error,
   } = useCreateSessionKey();

   if (error) {
     console.error("failed to create session key", error);
   }

   return (
     <button
       disabled={isLoading}
       onClick={() => createSessionKey(
         keyAddress,
         {
           approvedCallTargets: ["0x..."], // the addresses of allowed contracts or '*' for any
           nativeTokenLimitPerTransaction: 0.1, // the maximum amount of native token (in ETH) that the session key can spend per transaction
           startDate: new Date(), // the date when the session key becomes active
           expirationDate = new Date(Date.now() + 24 * 60 * 60 * 1000); // the date when the session key expires
         }
        )}
     >
       Create Session Key
     </button>
   );
 };
Conclusion
In this guide, we learned how to connect users to a React app using two methods:
- With the Connect Wallet component.
- With a custom UI component via the
useConnecthook. - Low-level control with
ThirdwebSDKProviderand the Wallet SDK.
Take a look at the GitHub Repository for the full source code!